Pages

Monday, November 18, 2013

My Dream Settee Reveal

I found this settee at Goodwill and I have been dreaming about a settee like this for years. Seriously I wanted one in my bedroom because they are small enough but beautiful. So here is a picture of how I found her:

Close up the wood had a lot of dings in it and the weaved sides of the chairs were scratched up so I wouldn't have been able to restain it. So I made up my mind and came out with this:


My first real upholstery project and I think I love it! 

Tutorial to come later.

Miriam

Monday, November 11, 2013

Olive and Myers Before and after shot

 Here it is before:
And after:


Tutorial Here
Miriam

Olive and Myers Dresser Redo

My husband and I aquired this dresser. It wasn't much to look at when we started so I wanted to make it pretty again. First here is the maker:

Such a cute sticker. I was also happy to see it was dove tailed and on the back it says its Satin Wood
I started with this:


Yes the hardware was dangling off the drawers


I had to think about what to do with this dresser because of all the cosmetic damage. 
So I decided I needed to paint the drawer fronts and the sides of the dresser  
and that I would stain the other parts.
Do you see how deep the circles are from the hardware. Crazy. So I filled it all with wood filler:

Then I sanded the whole thing down. the finish was so old it came off pretty easily,
 I didn't have to use the electric sander, just did it by hand.


There it is all sanded.


Then I taped off the parts that I didn't want painted and zinsser primed it with my wooser oil based paint brush. I took a 320 grit sand paper and sanded off any paint lines, drips and inconsistencies. 


Then I sanded the wood filler off to make it as smooth and flat as possible (I used 320 grit here also) and Zinsser primed them. I chose a flat beige paint for my color. I used a flat paint because I like to put a finish on top of the paint for better durability. I used Minwax polycrylic water based polyurethane on top of it with a foam brush.


Then I stained it with dark walnut minwax, just one coat.


 Then it was time to decide what to do about the hardware.
 I thought about just replacing it but this size was a little hard to find.
 If they were in better shape I would have left them in their original state
 because I think they were originally beautiful:

However they were scratched up and crazy looking. 
 So I went with an aluminum colored spray paint. 
I did this so the dresser can be used anywhere for anyone.

Here they are close up and attached

And here is the final product:


 Some close ups of the little details in the wood


 The top
and the bottom

I like how it turned out!

Miriam

Sometimes you change your mind

This happens to me all the time.
 I made a bench a few years ago.
 This one.


 And as soon as I put the fabric on I wasn't a big fan. 
So I waited until my kids dirtied it so much that it needed a change and then ran out and bought new fabric. Here is it now: 
 Yay. 
I also hated the fabric on my ottoman. 
Here is a picture of it after I recovered it: 


Here is the blog post
I waited until my kids made it super gross and then recovered it with a more hide the kids crazy fabric 
(it is outdoor easy to clean fabric of course)

Now I love it again.
 I am starting to see a pattern with the whole change things again and again. 
But thats ok because I love it again.

Miriam

Saturday, November 9, 2013

Carly's Oak Round Table

 This is Carly's oak round table. I didn't take a picture of it before I started sanding. Its your standard oak table with a very pretty pedistal.


Carly wanted a change so I had her look through pinterest and she found a table she loved (we just search road table with pedestal) There was no link to the photo we found so I googled around and finally found the original post for the table. There is a tutotial on there so go here if you want to see how to refinish this table. But here are some photos of my steps

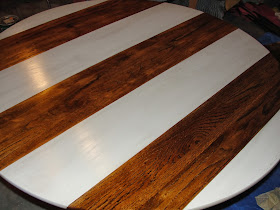
 tape and paint I used a very light grey

I didn't sand the pedestal I just used Zinsser oil based primer with my for oil based paint wooser brush. Then I had Carly go choose a dark turquoise that she liked just a pint (there was a lot left over too) I then used miniwax polycrylic water based over the 3rd coat of paint.

 I took the tape off and here is what that looked like
 One coat of Minwax Dark walnut
 (I really need to find a better stain for oak, it doesn't soak in the minwax stains like I want it to.) I put the stain on the paint to "distress" it a little
I didn't do what the tutorial said next, this is going to be used a lot and cleaned a lot so I wanted it to have a tough top so I used my waterlox finish on it. It will yellow the paint color because of the oil in the finish, the same would happen with any oil based finish. Here is is after the first coat of Waterlox (I used a throw away craft foam brush for each layer)

Then when I ran my fingers over it I realized the painted stripes felt a little higher, my fingers could feel the difference between the wood and paint so I did 2 coats of waterlox on the wood only to make it a little more even because of the 3 coats of paint. I ended up needing to sand just of the lines between the stripes on the paint and stain to make it even and smooth. It worked
 Then I waited 24 hours and did the second coat
 Lightly sanding it all with 320 grit and did another coat
 I did 5 coats total to make sure it was tough waiting at least 24 hours between each coat and sanding between every 2 coats. Then I waited 7 days for the top to cure and it was finished!! Here it is:


and with some random chairs that don't actually go with it.

Yay it is delivered and finished and I believe she loves it.

Miriam

Thursday, November 7, 2013

Sugar Maple O'hearn table reveal

 Here it is to start with
Here are the marking from underneath
And here it is after lots of elbow grease


I love how it turned out. I hope she does too!

Miriam