I started with this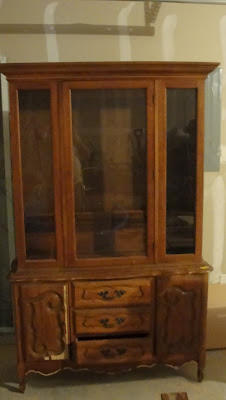 Here is the hutch I bought for $25 at a Rummage sale. I bought this 3 days before my son was born! You can imagine I was huge and I am sure the guy I bought it from was wondering why I wasn't in a hospital. I think he actually gave it to me for so little because I was so pregnant. Anyway it sat in the garage for 6 months driving me crazy. I decided I wanted to join the white hutch club. So I took all the hardware and doors off. I filled the holes with woodfiller because I wasn't sure if I was going to use the original hardware.
 Here is the hutch I bought for $25 at a Rummage sale. I bought this 3 days before my son was born! You can imagine I was huge and I am sure the guy I bought it from was wondering why I wasn't in a hospital. I think he actually gave it to me for so little because I was so pregnant. Anyway it sat in the garage for 6 months driving me crazy. I decided I wanted to join the white hutch club. So I took all the hardware and doors off. I filled the holes with woodfiller because I wasn't sure if I was going to use the original hardware.
I just used your regular miniwax wood filler
 It dried quickly and really hard so you just get some 120 sandpaper (or whatever you have around) and sand it flush.
I wiped it all down with a rag and water (use some dish soap if you have grease on there)
Then I taped it all off ( I didn't tape the inside glass very well and REGRET IT! I have been scrubbing paint off the glass for a long time now)
 Then I used my mini foam roller and zinser oil based primer and just rolled and rolled and rolled until I finally got it all covered. (if you are going to paint your hutch a darker color this paint is tintable and I would recommend having it tinted !)
 There it is all primed and ready for spray paint
 I used Rustoleum White semi gloss.
Now I learned something with this project. If you are going to paint a big piece of furniture white use regular old latex paint! I didn't do it because I didn't want brush strokes and thought it would be faster. It wasn't and I don't know if I will ever use spray paint again for a big white colored project. Only because of covereage. It takes sooo long to get the perfect white coverage. It seems like there are always places that didn't get enough. I sprayed this 4 times!! It took 5 cans of paint (so $23) when I could have just used one of my nice brushes with my high gloss valspar white. Its cheaper and lets face it it will take the same amount of time! (you have to wait an hour after each coat and each coat takes a long time!) And with your nice brush you shouldn't get too many brush stroke marks. I am making a mental note about this. (However with any other color I get perfect coverage!! so just white spray paint)
I was going to use polyurethane for protection but I chose to go with actual miniwax. Thats right the actual wax. This is not good if you have alot of rough bits on your furniture but if its pretty smooth its lovely. Way less fumes and fast but I am worried about durability. We shall see
After the wax I wanted some of the nice details to come out and while I think distressed furniture is beautiful I don't have any in my house which makes me think its not really in my design plans. So I chose to paint the strips. I wanted it to tie in with the fabric I used to cover the back so I made my own contraption with these:

I pretty much used what I had on hand and only used the poster paint because of the tint. O chose to use one of my nice water color brushes because I have more control over every stroke.

It only took two coats and I did it while we watched march madness.
Here is a door still wet.
Here is a door still wet.
 Then it was time to iron out the fabric and attach it to the wood on the back.

This kind of pattern is one that should be straight to I used masking tape on the back to keep the fabric in place (my husband kept asking me if I was only going to use masking tape to stick it on) Then I pulled out the glue gun and glued and glued. I pulled it really tight as I went because I wanted it to look tight.
Then we used nails to put it back on (it was really thick and my staples were not long enough) Next came putting the shelves and doors in (put the shelves in before you put the back on because its easier) and then we had our almost finished product here:
Then we used nails to put it back on (it was really thick and my staples were not long enough) Next came putting the shelves and doors in (put the shelves in before you put the back on because its easier) and then we had our almost finished product here:

I put the blue and whites in and I am still trying to get those situated how I want them

All that is left now is some hardware:
 I found these and liked them and bought them (they were on clearance at Lowes 70cents each!) But I don't think they are right for the piece. But I have 3 small children so the lack of hardware is really working in my favor with keeping all the doors and draws closed!
And thats how I did it.


