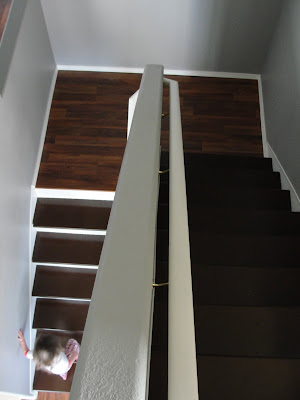
 So I researched and pondered and gnashed my teeth until I figured out what we were going to do! I did not want carpet on them. We live on a giant sand dune so I didn't want sandy carpets.
When you move into a new home that needs a lot of fixing asap you tend to get more daring and rip stuff up without too much though.
 Yes that is a stair tread
We figured we could replace it and be fine (no one was harmed in this redo). Luckily the closest store to us is Lowes and they are well stocked with pre-cut stair treads with the rounded edge. We went to Lowes and looked at the options for replacing treads. We ended up buying some of the MFD pre-fabricated stair treads. All we had to do was cut them to length. They were $8 each and we had 14 treads to do.
We chose MFD because I wanted painted stairs. If you want stained stairs the oak treads are $15 each and staining is time consuming but not difficult. I originally wanted black treads but our floors are fireside oak so I needed them to go together more. I chose to use Valspar floor paint and chose a very dark brown, like chocolate. This paint is only $28 a gallon and I still have a half gallon left. We ended up putting 3 coats of paint on them, 2 before we put them in
and 1 after. I am glad we put 3 coats on because they are much more durable and easier to clean.
After that it was time to go to work. Once Daniel (the laborer, just kidding) got the hang of ripping out the OSB treads, the demolition didn't take as long as we thought it would.
 The process of ripping up the old treads and putting in the new ones took 2 days, one day for each set of stairs (upper and lower). We then measured the length of each tread then use the table saw to cut. Make sure you do this for each one because there can be slight differences in length. We glued them in using hard as nails but I would use any construction adhesive for this. We used screws instead of nails because we didn't want any squeaks. We counter sunk the screws and then filled the hole with hard as nails and then put a precut wooden dowel in there and made it flush then wiped away the excess glue. Touching up the screw holes was time consuming because we used oil based paint (24 hours to dry).
When we touched up the screw holes we had to paint the ones on the sides first, let those dry overnight, then paint the ones in the middle and let those dry overnight. (It probably would have been easier if we didn't have little ones running up and down the stairs) After we painted the screw holes with 2 coats, we put one final layer on each tread to hide the screw holes better. Its a good idea to go out of town right after you do the last coat of pain unless you don't have to go upstairs for 24 hours. (we had a downstairs sleepover with mattresses and then a zoo day)
The next step was the trim work. We put the smallest piece of floor trim we could find at Lowes and ran it above the stair treads on either side.
After the trim was up we painted the area below white. Make sure to tape it all off first, use frog tape and not the regular blue tape! We had major leakage. (the white paint came off the treads really easily with baby wipes!)If you plan on doing this project do the beadboard risers before the white trim on the sides!!
So here we are so far

Next comes the bead board on the risers. Once again cut these to each stair because you might find small differences. For the tread cutting and the bead board cutting we used a table saw borrowed from a friend. They sell blades specific for mfd so buy it (just ask your home improvement store where they are)! It will save your regular blade. Put the beadboard right on top of the OSB. We tried gluing them in but they kept popping off so we used finishing nails instead. If you have a nail gun USE IT.
The final step was finishing the laminate wood flooring on the landing. Daniel finished it up and we bought a special stair nose piece from lumber liquidators (we just matched it to the flooring) We glued the stair nosing on with wood glue but hard as nails would have worked. Don't use gorilla glue because it just makes a big mess and doesn't work.
It took 30 minutes for the glue to set and we didn't have any weights or clamps to hold the stair nose on so Daniel sat on it while I brought him bowls of cereal.
It took 30 minutes for the glue to set and we didn't have any weights or clamps to hold the stair nose on so Daniel sat on it while I brought him bowls of cereal.
 So this is what all that hard work got us:


 I LOVE THEM.
However we are still were not done :( there were many spaces that the beadboard cutting and tread cutting left as you can see at the bottom of the stair above. So I got to caulking. Here are the small differences caulking makes:
no caulk (there is a gap on the side)

no caulk
 caulk
caulk
caulked
 caulking doesn't take too long and it just makes it look more finished. Big tip here is use baby wipes!! The white shows up pretty strongly on the brown so you need to make sure its all gone with a fresh clean swipe every time. The baby wipes were perfect because they were already wet and you could just throw them away and not ruin your rags.
Cost breakdown:
This project was time consuming but relatively inexpensive.
Treads-$112
Bead Board-$55
Floor Paint-$28
Trim-$12.50
Stair Nose-$29.00
Laminate Flooring (for the landing)-$30
- If you can get this done before you move in it will be much quicker because the most time consuming thing is having to space out all the dry times because you need to actually use the stairs
- Use a table saw and a mitre saw
- Use foam rollers ($2.67 for two pack at LOWES) for the oil based paint, no paint brush lines and you can just throw it away and use a new one each time so less clean up
- Do all the wall and trim painting very last or you will have to repaint anyway
- start on the tread that will be least seen because you get better after each one so you want your best work to be seen, not your worst
We love them and the cleaning is so easy just a wet rag!!! So even OSB stairs can get some special treatment.
Oh and these stairs were featured here on BetterAfter. On my family blog though :)

For more awesome projects visit these great blogs:


